This week I have finally finished the box! It has every panel on it, and I covered the seams up with some sleek metal tape to give it one continuous metal finish.
I am currently leaning toward not painting it. One of my user testers (roommate) said that this way it looks more like the new monolith, as in the one that showed up in Utah recently.
I also got some user testing in at last, mostly among my housemates.
They seemed to enjoy the experience, minus the handle I built in. I have some thoughts on how to fix that already. They gave me some great ideas to encourage use. I could post in ATLAS Slack that there is prizes in the box, and just put the code down for anybody to respond to and go pickup. I should be able to set up in ATLAS this week for sure. Probably Thursday the 1st.
For week 11’s progress, I hoped to wrap up everything. My to do list became more about integrating separate pieces together rather than finishing components.
Door
To wrap up the door structurally, I made a removable lid to hide the interior workings and shaved the back flat so I could add the metal panel to the back.
Handle
To allow the door to be opened, I added a minuscule handle, just the peg from a small solenoid to grab. It will be practically hidden until its time to be used, at which point it automatically deploys for use.
Solenoid handle with inline transistor
Software
To bypass my problem with port-forwarding on networks without permission, I have been made aware of a virtual port forwarding application. Ngrok, is an application that a runs in the background and intercepts packets intended for a specific port from a wider receptacle and forwards them through the network to the intended port. So long as both my application for Boxly is running concurrently with the ngrok service, everything should run smoothly.
Time Management
Once again, I am not quite finished, but through trial and error of working on the box, I have racked up about 13 hours of work, hoping to finally be done this week. I have also gotten the go ahead to deploy in ATLAS on the ground floor, so I hope to get good user data in the near future.
For week 10, I wanted to pretty much finish fabrication, and while I got close, there are still a couple of things that need doing.
I started out by finishing up my lock cylinders. They just needed some attachment points for servos, so I drilled holes in them and used JB weld to put eye hooks in them.
While that was going on, I tried out attaching metal panels to the box. Using a combination of caulk glues, they become very secure.
Next up, I started work on the door hardware. I put my cylinders in place, and rigged them up to servos. After shuffling a few libraries around in raspberry pi, I finally got a library that supported pins with servos (pigpio).
The servos are fixed in place with a combination of physical fasteners, hand crafted, and glue.
Raspberry pi test sketch w/ servo
After adding the other servo and playing with the code, I realized that the library I was using for the servos was not very robust. That is, it lacks specific commands. I tried to time the servos on and off by milliseconds in order to open and close the pins, but that failed. I instead took a sensing route, and added some home made location sensors.
Sensor in green on right
The sensor is just two leads sticking out. When the pin makes contact with the leads, a circuit is completed and the raspberry pi stops spinning the servo. Then to “lock” the pin, the servo is run a set amount of time to provide a certain amount of movement.
Excuse the poor picture quality.
Finally, I had all the pieces in place. I hooked up both sensors and servos, and modified my code I used for my LED twilio example. And eureka. Servo motion triggered by an SMS.
That pretty much completed the door, I only needed to fasten all the components in place, and put holes in the frame for the pins to fit in.
Finally, I finished fabricating my last interior panel by trimming it down a bit and putting the lights in it. I needed to solder up a barrel jack connector to the light strips in order to provide them a safe ample power source.
Time Management
I didn’t have real concrete goals this week. I just knew what needed to be done and I did it. I lost track of time spent, however, I guess it is in the neighborhood of 14-18 hours.
There are just a couple of things that still need to be done to finish the box itself, but I predict I can be project completed by next week and deployed Sunday or Monday.
My goal for week 9 was do a lot of my fabrication on the box. I plan to continue that into next week, with my construction hopefully being finished in week 10.
I first reinforced all the sides of the box with more 2x4s using metal stud reinforcers, glue, and caulk to fix them into place. The added bracing will strengthen the metal shell and particle board interior significantly.
With the frame fully reinforced, it was time to start applying the shell and working on the door.
I first finished cutting up the interior panels to fit, before moving on to working on the door and shell. These were the last cuts I should have to do.
I next needed to cut some recesses for my hinges to sit in. I used my drill to cut holes around and under the area I needed, then used the claw on my hammer to carve out the holes.
Once the hinges were mounted, I needed to fasten the mounting brackets to the door. the hinge design however, is constructed in such a way that the hinges lean in a little bit. That is, the brackets angle in, so if I attached the door on them flush, my door would be inset at an angle. To counter this, I made some simple spacers from some scrap metal, using advice from my father.
I used vise grips to hold my metal in place and drilled holes to put my bracket screws through. Once the spacers were made, and my brackets in place, I just needed to clip them in place and my door would be mounted.
Time Management
I planned to do most of my remaining construction this week, and I accomplished that. I got my door put together, and finished reinforcing the box. I just need to attach the metal and fit the door with the locking mechanism and the project’s physical aspect will be done.
This week for Capstone adventures, I set out to cast my aluminum lock pins. I have done enough aluminum casting in my day to be comfortable doing this, but this particular technique was a first for me, and as you will see it went awry.
I started out by mixing some plaster up with sand and water. When the mix has the consistency of a Wendy’s vanilla frosty (not required to be vanilla but the mix uncannily resembles a frosty, despite the fact that I am using McDonald’s cups) the mix is ready to set. It sets quite fast so it is important to get a move on. Vamonos!
These pipes are approx. 1 inch in diameter and coated in canola oil to allow them to be removed once the mould (or mold?) has partially set. Now its time to get the forge cooking.
This is my forge (alternately smelter) setup. I am very proud of it. It uses a galvanized steel can as a container, and industrial grade insulation I picked up from a job as the lining. This stuff can take a lot of heat (around 4000 F) without degrading. Inside is a graphite crucible to contain my metals. I have melted metals as high as copper (1984 F) in the past.
These are some aluminum donuts (ingots) I made prior to this. They were melted down from aluminum cans. Once the moulds were partially set, I removed the tubes from them, leaving a negative void to fill. I placed them in my sand bucket to protect my environment while pouring. It was also really snowy out which was a convenience for my high temperature project.
One more note on my forge. It utilizes a custom propane jet that I manufactured in the ITLL. A small brass tube has a tiny hole (1/64 inch) that pushes high pressure propane down this cast iron tube. It draws fresh air after it, creating a perfect flammable mix of gasses.
Pour Time
This was not only dangerous but also stupid. I really dropped the ball here. Don’t ever pour into wet molds
So long story short, dry your molds. I remember specifically thinking, should I dry these out? And I thought naw, plaster absorbs and chemically removes the water. Not true. I ruined my pour.
Cool mushroom shape though, caused by uplifted steam while pouring.
Time to rinse and repeat. I still had daylight.
This time we were thinking a little more. I first baked them (pottery style) for some minutes in hopes that the moisture would be drawn out. The crackage is an effect of that, which bothered me at first but I was optimistic that it would turn out.
The second pour still had a little moisture but for the most part it was settled.
The length ended up a little shorter than I was hoping, but these will be usable for sure.
A little bit of honing later and they looked pretty good. I removed the large chunks from the shorter piece and started sanding away.
I still need to work on them a bit more, but I am happy with how they are turning out.
I used the angle grinder to chop them the same length and create a better flat side. I then did some more polishing and am satisfied with the final look of them.
I needed to enlarge the holes they go through on the door, but after that, eureka. They fit beautifully in the door.
Metal Cutting
I managed to leverage some contacts from my construction to obtain some sheet metal at immensely discounted prices. I then used a university connection, fellow ATLAS Capstone student Destin Woods to plasma cut my metal. He brought me to the theater shop where he works, and I helped him cut my metal.
The process went along a simple order of steps. Measure, secure, and cut. We used proper helmets and safety gear, making the job easy.
And finally I have all of my materials. This next progress week should be full of heavy advancements in my project.
Time Management
Goals for week 8
Cast aluminum lock cylinders: 6 hours
Get metal cut: 4 hours
misc. 2 hours
Actual Time Use
Casting Aluminum: 7 hours
Touch-up aluminum: 2 hours
Cutting metal: 3 hours
misc: 2 hours
Reflection
It took much more time to cast than I anticipated. Maybe it was a little cocky to expect to get a perfect cast on the first try, but wow did that not work. I didn’t get burnt and it was kinda fun to watch despite the danger. Everything turned out ok in the end so I will call that success.
For week 7 I initially wanted to do the exterior of the box. Unfortunately my contacts of getting metal cheaply are not responding. However, I pivoted and instead chose to work on the door and interior of the box. I also got some conversations going for solving my IT problems
Door Construction
To start off, I got more materials and took stock of what I had on hand. I happened to have some left over particle board and Masonite, so utilized them.
Using my CAD model from the previous week, I made some basic sketches to assist my cutting and assembly. I needed to get the door thickness to be 1.25 inches, so I used two pieces of particle board 1/2 inch thick each, and 2 pieces of masonite, 1/8 inch thick each. I sandwiched them with glue and screwed them together to hold them while the glue dried.
2×4 to be cut and used for lock cylinders
After the baseplate was finished, I took some wood to the ATLAS lab to cut with more precise tools. I needed to rip a 2×4 with the grain and a table saw is much more effective for that. I ripped it so that its new dimensions were 2×1.75.
I next outlined where I needed the holes to go for the lock cylinders.
I then used the drill press to put some 1 inch diameter holes centered at 1.75 inches from the ends. I lined them out so the edge of the holes would be inline with the edge of the wood itself.
Lock Cylinder holes
Once that was finished, I applied glue to it at home and screwed it to my door piece
Interior
Finally, I cut up some pieces of my masonite to use as interior panels. I crafted a top and bottom, and will create sides and a back panel at a later date.
These were made by cutting squares and taking out corners until they fit in line with the boarded corners.
Time Management
Admittedly, I have been struggling to commit to my work the past 2 weeks. However, I feel much more motivated now and plan to really attack the project over the next few week. I would like to be finished and deployed by mid March.
For my second Mentor discussion, I reached out to area artist Clay Hawkley. I found Mr. Hawkley’s work on a magazine webpage called the 303 magazine. Mr. Hawkley had a piece in a recent exhibit at the Dairy Arts Center in Boulder called “Touch”. His pieces in the exhibit particularly interested me.
Mr. Hawkley designed a piece of paper covered in graphite. The ideas was that people would touch their hands to the paper, covering them in graphite, and then touch all of the walls surrounding the piece. What intrigued me about this, was that there was no instructions. He managed to prompt an interaction from people without demanding or instructing. I aim to create a similar interaction.
While Mr. Hawkley is not typically an interactive artist, this exhibit was special to him and very unique. He emphasized that the label of the exhibit “Touch” helped inspire the interaction, but the actual action was all natural. He stated that lighting is a way to highlight what you want people to do in a subtle manner.
He also said it is important to minimize instructions and let people do what feels natural, as it makes the interaction all the more memorable. In response to the description of my project, he thought the monolithic inspiration was quite memorable. He thought that the monitoring system I plan to utilize adds an interesting element to it.
Something that had never occurred to me, he asked what I planned to do about people leaving fingerprints on my pristine black surfaces. I think that these tell-tale clues could be interesting as giving people evidence of past interaction and grabbing their attention focusing their curiosity.
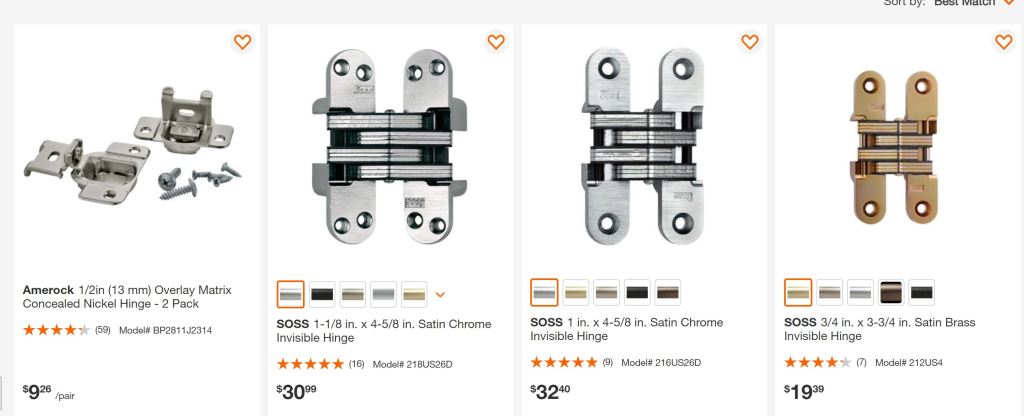
For my first mentor review, I spoke with Daniel Rankin, ATLAS faculty and design extravaganza. I consulted him specifically on the design of my box’s unique hinge design. He suggested that I look into pre-made designs that exist.
I was completely unaware of hinges like those he recommended to me.
His critique of my design was that it could be weak at the pivots, especially given that it can move on multiple axis. Additionally, he voiced concern over whether people would close it properly when operating my design.
He sketched up some designs to provide an example of what he was thinking of.
And finally he directed me to some hinges offered through home depot to consider using in my design.
My meeting with Danny provided some much needed critique on my door, which I was still skeptical over. I think this new information will push my designs in a much more productive direction.
This week was a bit dysfunctional for me, however I did manage to complete some of my objectives and found some issues with some of my current designs that will need to be changed. Additionally, I sent and received several lines of communication in regards to my project.
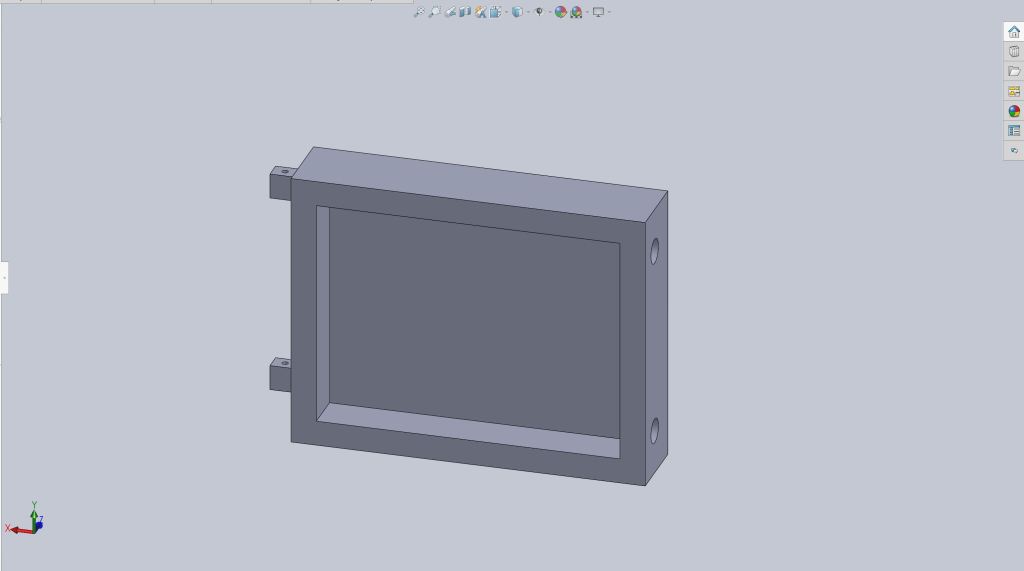
I have done some additional CAD outlining the actual dimensions and shape of my door module.
I plan on housing the Raspberry Pi and the lock cylinders within this. It then connects to the door panel with glue.
Image with basic drawings of components. Note: Lock cylinder w/ servo to be duplicated above
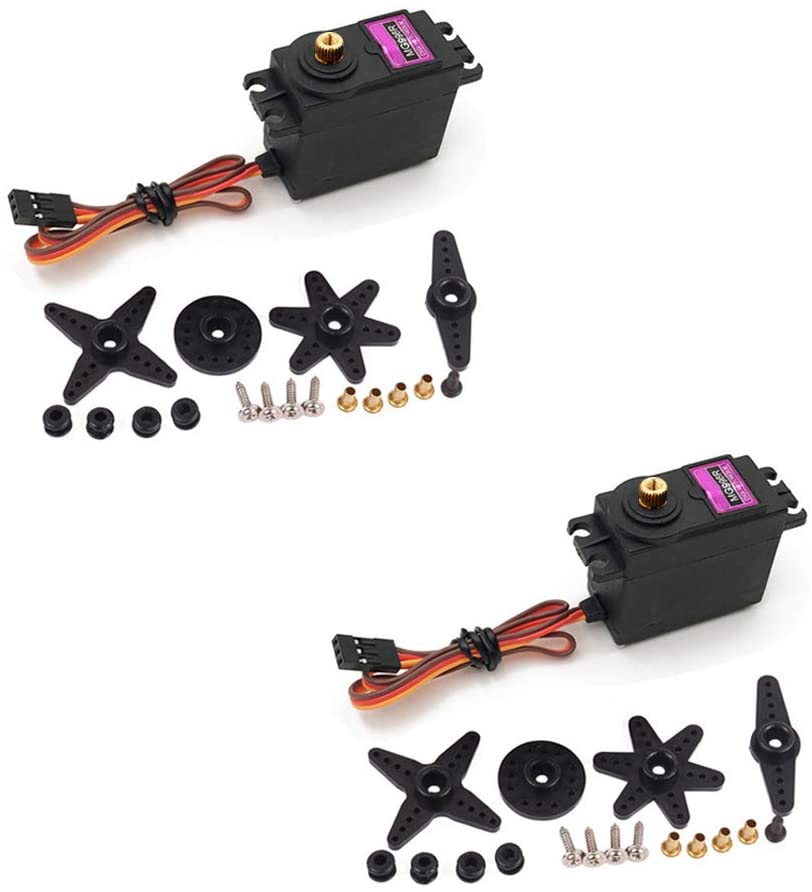
I decided after a bit of fidgeting with them that the solenoids I had previously selected for my lock cylinders were too weak to move the locks I want to utilize. I will be replacing them with servo motors to provide more strength.
High Torque replacement servos
Weak Solenoids. May be able to repurpose
As far as my issue with establishing a port forward in the Atlas building, I have contacted Ian about that and he forwarded me to IT services in the university. He also assured me that if that doesn’t lead me anywhere productive he has some personal contacts that he can loop me into.
In the process of CADing up my door panel design, I decided to change the dimensions of its swivel on the hinge. I spaced it out a little more and added more substance to it. This was changed to allow more hinge movement and to provide more material around the hinge, strengthening the component.
New strengthened Hinge
Previous design, thin walled
I plan to get material for the shell in the very near future. I have some contacts from when I worked for a general contractor that said they can get me some materials at little to no cost. And Destin Woods is still willing to help me laser cut metal.
Time Management
This week I did not do as much as I planned, but I am not too behind at the moment. I have to wait for some things to come together, but next week I can put in a lot of work.
For my week 5, I set out to finish up what I missed the previous week. I needed to set up a raspberry pi system that could activate electronic components when a certain SMS message is sent.
To accomplish this I followed a tutorial I found online. However, while working through it, I found that the tutorial was rather dated, and a lot of the parts of it had changed. Not drastically, but a lot of the resources I needed to use were different now in appearance and function.
Overview
The basic process was completed as follows. Set up a raspberry pi with Node Js, I was going to use Python, but my previous experience with JS made it the better choice. Node JS allows a raspberry pi to use the packages I was going to need.
Once the Pi was set up, I set up a twilio account with webhooks that routed through my local IP address. These webhooks send information through my Pi so it can be triggered if the correct SMS message is sent.
I then needed to add a port forward to my router. This allows information from outside my LAN to be sent into the raspberry pi. Without adding a port forward, the webhooks would never manage to reach the pi and it would not work.
Finally, I made a simple LED circuit that would turn on when the correct SMS message is sent.
Time Management
Goals:
Make simple raspberry pi SMS service: 6 hours
Actual:
9 hours
When I dove into the tutorial I expected challenge of course because a lot of this was new to me. I did not expect an outdated tutorial to fight me. One element that caused the most pain was installing a node packet called rpi-gpio. This packet allows JavaScript to use the raspberry pi’s pin system. However, apparently this packet had not been updated with raspberry pi’s os and the newest Node JS package. As a consequence, my script ran fine and received my SMS messages, but the pins wouldn’t turn my LED on. I ended up having to find a different packet to accomplish the same thing and change the code to run the pins. Every package library has different syntax to accomplish the same thing. Eventually after 4 tries, the package Onoff turned out to work flawlessly.